Adding toolkit pages

Creating your toolkit homepage

You can now progress to creating your  toolkit homepage.  Each top level section within your toolkit appears as a tile on the homepage, as below: 


To do this, follow the steps below:

1. Right click on the name of your toolkit, and click "Create"

2. Select the type of page you would like to add - see the "Content page types" section below.

3. Enter a name for your page. This will appear in the black box underneath the tile, as in the image above.

4. Click 'Page settings' to add an icon image - see  the videoclip in the "Adding media" section below.

Adding content pages

An overview of the types of content page available

When you first start using the RDS, you are most likely to need to use the Content page, Listing page and Guideline page types. 

Content page 

This is a blank page into which you can place text, images, videos etc.

You can also create accordion sections within this page - i.e. clickable Expand-Collapse headings. 

Listing page 

This page will allow you to link to other sub-pages, like a menu.

There is also space to add text above the list of sub-pages.

Guideline page 

This is a page with the Guideline template. It is very similar to the Content page, but includes a coversheet where you have the option to enter guideline objectives, and a special section for creating a "References" panel.

Pathway page 

This is the page you select to place a visual pathway or flowchart. You will need to create the pathway using the Pathway Builder tool, which is accessed through the pathway page template.

Shared content picker 

This is the page you select to place content which you created in the Shared Content space. For more information on the Shared Space, click here.

Calculator page 

Can be used to insert a calculator in a webpage, using the Macro icon in the rich text editor.

Contact page 

Can be used in conjunction with the listing page to create a header or grouping, then add this to add person specific details

Condition hospital page 

Page with a special template for conditions  in hospital settings.

Condition primary care page 

Page with a special template for conditions in primary care settings.

Direct link page 

Use this to create a direct link to a page or section within your toolkit,or to pages at any level within another RDS toolkit. 

Drug page 

Special template for medicines.

Forms page 

Can be used to create a direct link to a M365 Form. An alternative is to use the Forms tab within a standard content page to create a  ‘pop up’ form. 

Media page 

This page will link directly to a piece of media (image, file etc.)

Treatment page 

Special template for treatments

Question Answer Builder Pathway 

You can use this page type to embed an interactive Question and Answer tool created in the Question and Answer Builder section of the RDS.

Question and Answer Decision Aid Pathway 

Use to create simple question and answer pathways that do not require the full complexity of the main Question and Answer builder. 

Ordering toolkit pages

Toolkit pages will appear in the order you create them, however they can be moved around as necessary. To do this, right click on the parent page (i.e. the page that your sub-pages  sit within) and click "Sort". You can then drag the order of the pages to rearrange.


The video below demonstrates how to add a new page to your toolkit:


Video Summary:

    • Go to the ellipsis (row of 3 dots), in the section where you want to add a new page, this brings up a menu of options for your new page.
    • In this video example, a new blank page has been selected
    • Add your title to the text box
    • In the page content, you can add the main text of your document, then format it etc.
    • Save your work

Uploading content

You can now proceed with uploading your content to your toolkit pages. 

Here are some things to note when uploading materials to content pages:

Copying text from original documents

Always copy and paste content as plain text then format in RDS as described below. This is to avoid hidden code in Word docs, PDFs etc. from altering or omitting content. Use a text editor such as Notepad and always ask content owners to carefully check content for accuracy before signing it off.

Changing text style

When you copy/ paste text into the text box, it will automatically set to the default Right Decision Service style. To change the text style, you can use the Rich Text Editor.

See the Style Guide Standard Operating Procedure to ensure your style is in line with the RDS conventions.

Accordion sections

If a page contains a large volume of content, you can segment it into 'Accordion content sections', using the second tab on the  menu of Content pages and Guideline pages:

You can create smaller content sections which users can click to open. You can set accordion sections to be open as default by toggling on the "Open by default" button which appears when you create a new section.


Linking

You can create links to a another page within your toolkit using the link () button on the Rich Text Editor. Click the icon, and then scroll through your toolkit structure in the list until you find the page you would like to link to. Select this page, and click 'Submit'.

You can also link to content within a page (e.g. a specific paragraph) using the anchor () button. To do this, follow the instructions below:


1. Create the content you want to link to.

2. Enter the id which will act as the target for your anchor link. There are two ways to do this:

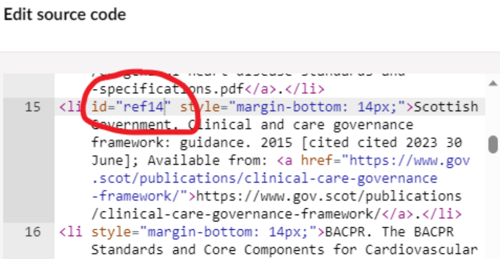
a. Access the source code and add an ID tag to within the element you want to link to.

  • The format is id=”x”, e.g., id=”ref14”
  • In context, this could look like: <p id=”ref14”>Your text</p>

OR 


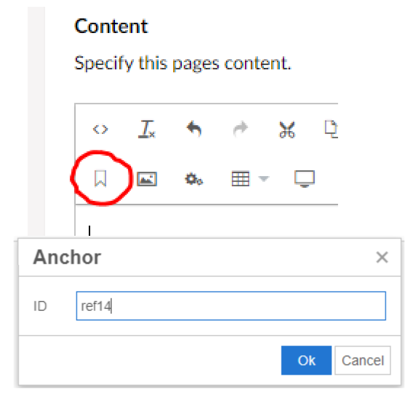
b. Highlight the content you want to link to, click on the anchor icon on the toolbar, then enter your ID tag. This will add an element containing that ID to the selected section of the page.


3. Add a hyperlink which will link to your anchor. When editing the link, enter your id in the ‘Anchor / querystring’ box.


4. When you click on the hyperlink, you will be directed to the target section within the page.